How to Bunt in Baseball: Every Type of Bunt Explained

Learning how to bunt in baseball is one of the most underrated skills a hitter can develop. We have coached players at every level who treat bunting as an afterthought — and those same players consistently leave runs on the base paths when the game is on the line. A well-executed bunt can change an inning, move a runner into scoring position, or turn a routine out into an infield hit.
In this guide, we cover every type of bunt, the proper mechanics for each, and the game situations where each one gives your team the best chance to score.
- A sacrifice bunt is designed to advance a runner at the cost of an out — angle the bat to direct the ball toward the appropriate baseline.
- Hold the bat loosely at the barrel end with the top hand; soft hands absorb the pitch and prevent the ball from popping up.
- The drag bunt is used primarily by left-handed hitters to beat out an infield hit, using their momentum toward first base as an advantage.
- The squeeze play — where a runner on third breaks for home on the pitch — requires near-perfect bunt execution to succeed.
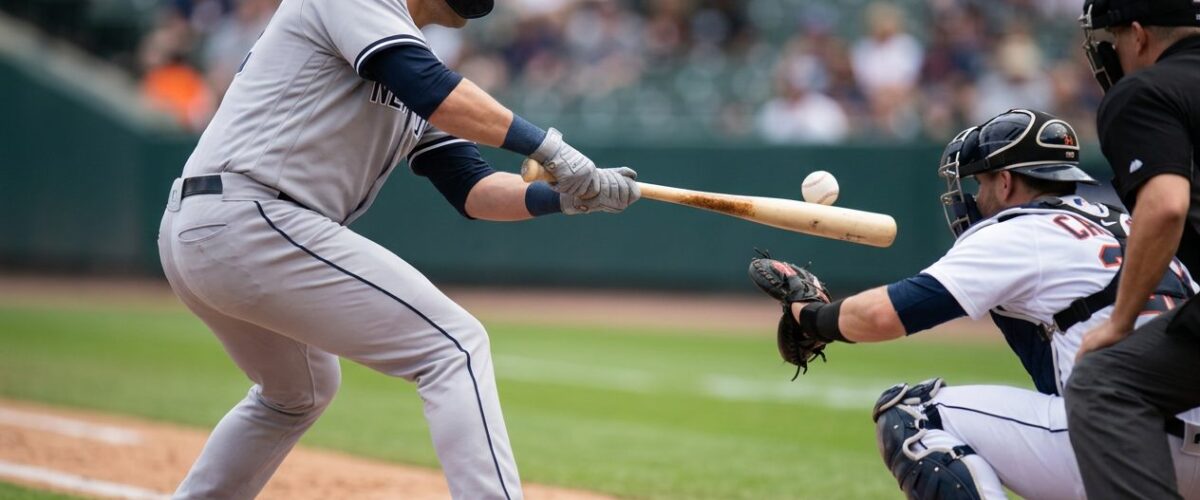
- Bunters should cover the top half of the ball at contact: bat above the ball’s center prevents pop-ups, which can lead to double plays.
- Practice bunting from live pitching, not just soft toss — the speed and spin of a real pitch changes the required bat angle significantly.
The Fundamentals of Bunting
Stance and Footwork
There are two accepted stances for the sacrifice bunt. The pivot stance is the most common at the amateur level.
The Pivot Stance:
- Start in your normal batting stance.
- As the pitcher begins the wind-up or stretch, pivot on both feet so your body fully squares to face the pitcher. Your toes should point toward the mound.
- Slide both feet so your toes are on the front edge of the batter’s box — this gives you the best plate coverage and keeps you in fair territory.
- Flex your knees slightly. Stay athletic and balanced, not rigid.
The Turn Stance (used more at higher levels):
The turn stance keeps your feet in the original batting position longer, showing the bunt later and giving the fielders less time to charge. Only your upper body pivots — hips and shoulders rotate toward the pitcher while your feet stay in a modified hitting position. This is harder to execute cleanly but more deceptive.
Bat Grip and Hand Position
This is where most beginners make their biggest mistake. Hold the bat with your bottom hand as usual — this hand controls direction. With your top hand, slide it up toward the label of the bat, gripping loosely with your thumb behind the barrel and your fingers on the top.
Keep the top hand fingers curled back slightly so the barrel sits in the channel between thumb and fingers — never flat in the palm. This protects your fingers from a foul tip and gives you better angle control.
Grip pressure: firm with the bottom hand, loose with the top hand. Soft hands are the key to a good bunt. A tight grip causes the ball to pop up or drive hard back to the pitcher.
Bat Angle and Ball Direction
The bat angle at contact determines where the ball goes. This is the core skill of sacrifice bunting.
- To bunt toward the third base line: angle the bat with the barrel pointed toward third base (for a right-handed hitter, the barrel tilts left, the handle tilts right).
- To bunt toward the first base line: angle the barrel toward first base (barrel tilts right, handle tilts left).
- For a dead bunt directly in front of the plate: keep the bat perpendicular to the pitcher.
The angle combined with soft hands produces a ball that rolls gently into fair territory. A hard grip with the same angle produces a hard bunt that arrives at the fielder much faster.
Types of Bunts in Baseball
1. The Sacrifice Bunt
The sacrifice bunt is the most common and the first one every player should master. The batter intentionally gives up an at-bat to move a runner into scoring position.
When to use it: Runner on first with no outs (advancing to second), runner on second with no outs (advancing to third). The decision depends on your team’s situation — down one run in the late innings, getting that runner to third with one out gives you multiple ways to score (wild pitch, sac fly, passed ball, or infield hit).
Key execution point: Catch the ball on the bat — do not swing at it. The bat meets the ball; the ball does not drive the bat. Think of the bat as a backstop that redirects the ball’s energy rather than adding any of its own.
2. The Drag Bunt
The drag bunt is a surprise bunt designed to be a base hit. The batter drops the bunt and immediately breaks for first base — the whole motion happens in one fluid sequence rather than the deliberate pivot of a sacrifice.
Left-handed hitters have a natural advantage on the drag bunt because their stance already faces first base and their momentum carries them toward the bag as they make contact. A left-handed drag bunter dropping a ball down the third base line while already in motion is one of the hardest plays to defend in baseball.
Right-handed drag bunt mechanics:
- Take a small crossover step with the right foot toward the pitcher’s mound as the pitch arrives.
- Place the bunt simultaneously — not before the step.
- Immediately break for first base off the left foot.
The drag bunt should be disguised as a normal hitting stance until the last possible moment. If the infield reads your intent too early, the first or third baseman charges and takes away the play.
3. The Push Bunt
The push bunt is designed to go past the pitcher’s reach — placed firmly between the mound and second base. It is typically right-handed batters pushing the ball toward the right side of the infield or pulling it away from a charging first baseman.
This bunt requires more contact force than a sacrifice bunt — you are redirecting the pitch with a bit of intent rather than simply deadening it. The first baseman charging hard is vulnerable to a push bunt through the gap they are vacating.
4. The Squeeze Bunt
The squeeze play is one of baseball’s most exciting and risky plays. With a runner on third base, the runner breaks for home on the pitch while the batter lays down a bunt. A successful squeeze scores the run; a failed squeeze (pop-up, foul, missed bunt) typically results in the runner being tagged out well before reaching home.
Types of squeeze:
- Safety squeeze: The runner breaks only if the bunt is placed successfully. Lower risk, lower reward.
- Suicide squeeze: The runner breaks with the pitch regardless of where the ball goes. The batter must make contact — missing the ball entirely means the runner is almost certainly thrown out.
The suicide squeeze requires the batter to bunt any pitch they can reach, including balls outside the zone. The commitment is total and the communication between runner and batter must be clear beforehand.
Bunting Situations: When to Call Each Bunt
| Bunt Type | Runners On | Outs | Game Situation |
|---|---|---|---|
| Sacrifice Bunt | 1st, 2nd, or 1st&2nd | 0 or 1 | Need to advance runner, close game, weak hitter up |
| Drag Bunt | Any or none | Any | Fast runner at bat, infield playing back |
| Push Bunt | 1st or none | Any | First baseman charging hard, pitcher not covering well |
| Suicide Squeeze | 3rd | 0 or 1 | Need one run, good bunter at plate, pitcher in rhythm |
| Safety Squeeze | 3rd | 0 or 1 | Need one run, want runner’s discretion |
Common Bunting Mistakes and Fixes
Popping Up the Bunt
A popped-up bunt is the worst outcome — the ball hangs in the air long enough for a double play. The cause is almost always bat angle: the barrel is below the ball at contact, which sends the ball upward. The fix is to angle the barrel slightly above the ball’s center. Think “bat on top of the ball.”
Bunting Too Hard
A bunt that arrives at the fielder too fast defeats the purpose of the sacrifice — the fielder has time to throw to the lead base. Loose hands at contact are the solution. Let the ball hit the bat rather than driving it. The pitcher’s momentum already provides plenty of energy.
Waiting Too Long to Show the Bunt
For a sacrifice bunt, you want to pivot and show the intention early enough to cover any pitch location. Waiting until the ball is halfway to the plate leaves you scrambling to adjust the bat angle. The sacrifice is not a surprise — show it, be ready.
Dropping the Bat Head Too Low
Bunters who let the bat angle sharply downward — barrel pointing at the ground — consistently bunt foul into the dirt. Keep the bat nearly level, with the barrel at or slightly above the handle.
Bunting Drills to Build the Skill
Tee Bunt Drill
Set a tee at various heights and practice placing the bat against the ball with proper soft hands and angle. Focus exclusively on angle and hand position without worrying about pitch timing. Check out our baseball hitting drills guide for additional bat control exercises that complement bunting work.
Soft Toss Bunt Drill
Have a partner toss from 10–15 feet at half speed. Practice directing the ball to the first base side and then the third base side on alternating pitches. This builds angle awareness with a moving pitch.
Live Arm Bunting
Practice bunting against a live pitcher at full speed. This is irreplaceable — no drill simulates the spin and late movement of a real pitch. Many coaches at every level use bunting against live arms as part of batting practice rotations, not a separate activity. Coaches at USA Baseball recommend incorporating bunting into every live BP session rather than treating it as a separate skill block.
Understanding how bunting fits into team strategy is part of developing as a complete hitter. Our Baseball 101 guide covers scoring strategies and small-ball concepts that give bunting its full context. And for how the best hitters think about every plate appearance — including when bunting is and is not the right call — see the approach analysis at Baseball Reference.
Frequently Asked Questions
How do you bunt in baseball without popping up?
Keep the bat barrel at or slightly above the ball’s center at contact. Angling the barrel below the ball is what causes pop-ups. Use loose top-hand grip to absorb the ball’s energy rather than deflecting it upward.
What is the correct hand position for bunting?
Bottom hand stays in the normal grip position for direction control. Top hand slides up to the bat’s label area, with fingers curled back so the barrel rests in the channel between fingers and thumb — never flat in the palm. Top hand should be loose to absorb the pitch.
When should you use a sacrifice bunt?
The sacrifice bunt is most valuable with a runner on first or second and no outs, in a close game where one run is meaningful. It is less valuable with a strong hitter at the plate or in situations where a double play is unlikely (runner on second, no runners on first).
What is a drag bunt in baseball?
A drag bunt is a surprise bunt designed as a base hit rather than a sacrifice. The batter drops the bunt while simultaneously breaking for first base. Left-handed hitters execute it most naturally because their stance faces first base and their momentum moves toward the bag at the moment of contact.
What is the squeeze play?
The squeeze play has a runner on third base breaking for home as the pitcher delivers. In the suicide squeeze, the runner commits regardless of pitch location and the batter must make contact on any pitch. In the safety squeeze, the runner only commits if the bunt is placed successfully.
Should you bunt on a two-strike count?
Yes, with caution. A two-strike bunt that goes foul is a strikeout, unlike regular batting where a foul on two strikes simply maintains the count. This means bunters on two strikes must be especially careful to either make solid contact or take the pitch if it cannot be bunted fair.
How far should a good sacrifice bunt travel?
A well-placed sacrifice bunt should roll 15–25 feet from home plate, far enough that the pitcher cannot field it before the baserunner advances but close enough to the baseline that the third or first baseman cannot make a play on the lead runner. The ideal is a softly rolled ball that dies in fair territory before reaching the fielder.