Catcher Pop Time: How to Throw Out Base Stealers with Footwork, Transfer, and Drills for Every Level
Last updated: March 29, 2026
The first time I watched a high school catcher gun down a runner at second base on a clean 1.85-second pop time, I understood why coaches recruit catchers the way NBA scouts chase shooters. Pop time, the stopwatch number that measures how fast a catcher can release the ball from the moment it hits the mitt to the moment it lands in the middle infielder’s glove at second base, is the single most public stat for catchers in 2026. Statcast publishes it. College recruiters demand it. Professional scouts grade it. And every base stealer in the league knows what number they have to beat.
I have spent the last decade catching at the high school and college level, and the last five working with catchers as a private coach. I have stopwatched thousands of throws, broken down film for hundreds of receivers, and watched the same mistakes appear at every age, from 10U through Double-A. This guide is the system I teach. It covers the mechanics that produce a fast pop time, the drills that train each link in the chain, the equipment that supports the work, and the common errors that quietly add tenths of a second to your release. If you are a catcher who wants to throw out runners, or a parent or coach trying to develop one, this article walks you through every element of the position’s most measurable skill.
What Pop Time Actually Measures
Pop time is the elapsed time, measured in seconds, between the instant a pitch strikes the catcher’s mitt and the instant a fielder catches the throw at the receiving base. The standard measurement is to second base, but coaches also stopwatch throws to third on left-handed-batter pickoffs and to first on backpicks. Statcast, which has tracked every throw in Major League Baseball since 2015, defines pop time the same way and publishes leaderboards every season. The clock starts on the pitch arrival, not the swing or the runner’s first step, and stops on the catch, not the tag.
Pop time alone does not throw a runner out. It is one of three numbers in a race. The other two are the runner’s stolen base time, which measures how long it takes the runner to cover 90 feet from the lead at first to the bag at second, and the pitcher’s time to the plate, which measures how long it takes the pitch to leave the pitcher’s hand and arrive at the catcher. Add the pitcher’s time to the catcher’s pop time, compare it to the runner’s stolen base time, and whoever has the lower number wins. A 1.95 pop with a 1.30 pitcher delivery beats a runner running a 3.30. A 1.95 pop with a 1.55 delivery loses to that same runner. Catchers control their portion of the equation, and that is what this article is about.
Pop Time Benchmarks by Level
Numbers without context are useless. A 2.10 pop time is elite for a 13-year-old, average for a varsity senior, and unplayable in pro ball. The benchmarks below come from a combination of MLB Statcast data, college recruiting reports I have collected from Division I and Division II programs, and showcase data from Perfect Game and Prep Baseball Report events between 2022 and 2025. Use them as targets, not rigid cutoffs.
| Level | Below average | Average | Above average | Elite |
|---|---|---|---|---|
| 10U–12U | 2.50+ | 2.30–2.49 | 2.10–2.29 | Under 2.10 |
| 13U–14U | 2.30+ | 2.15–2.29 | 2.00–2.14 | Under 2.00 |
| High school JV | 2.20+ | 2.05–2.19 | 1.95–2.04 | Under 1.95 |
| High school varsity | 2.10+ | 1.95–2.09 | 1.85–1.94 | Under 1.85 |
| Division I college | 2.00+ | 1.90–1.99 | 1.80–1.89 | Under 1.80 |
| Minor leagues | 1.95+ | 1.90–1.94 | 1.85–1.89 | Under 1.85 |
| Major leagues (2025 avg 1.96) | 2.05+ | 1.95–2.04 | 1.85–1.94 | Under 1.85 |
For reference, the fastest pop time recorded in the Statcast era belongs to J.T. Realmuto, who has multiple throws under 1.80 and once posted a 1.74 in 2018. In 2025 the MLB leaderboard topped out around 1.84 (Patrick Bailey of San Francisco), with the league average sitting at 1.96 seconds. The takeaway is that even at the highest level, the difference between elite and average is roughly two-tenths of a second. Two-tenths of a second is also the difference between safe and out on most stolen base attempts. There is no other defensive skill in baseball where such a small margin produces such a large outcome.
The Three Phases of Every Pop Time
I break pop time into three measurable phases, and I time them separately whenever I run a development session. Each phase has its own mechanics, its own drills, and its own ways to fail. If you only chase the total number, you will not know which link in your chain is slow.
- Receive (mitt to transfer): The time from ball arrival to when both hands are together at the chest with the ball secured. Elite catchers do this in 0.30 to 0.45 seconds.
- Transfer and footwork (transfer to release): The time from secured ball to ball leaving the throwing hand. Elite catchers do this in 0.55 to 0.75 seconds.
- Throw (release to catch at second): The time the ball is in the air. Elite catchers do this in 0.75 to 0.90 seconds depending on arm strength and ball flight.
Add those up and you get a 1.60 to 2.10 pop. The reason most amateur catchers throw a 2.20 or slower is rarely arm strength. It is almost always the middle phase. Transfer and footwork is where the time is hiding, and it is also the phase you can improve fastest with focused work.
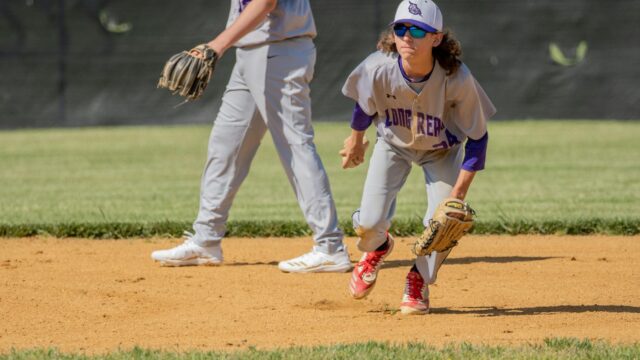
The Receiving Stance for a Quick Release
You cannot throw quickly from a stance that traps you. The “throwing stance,” sometimes called the secondary stance or runner-on stance, is what you use any time a steal is possible. It is different from your primary, no-runner stance, where you can sit lower and prioritize a quiet target for the umpire. Get this part wrong and the rest of the chain will not save you.
- Feet: Slightly wider than shoulder width, right foot a half-step behind the left for a right-handed thrower (mirror for lefties). The right foot turned out about 30 degrees so the hips can fire without restriction.
- Hips: Off the ground. Elevate the seat enough that the thighs are roughly parallel to the dirt, not buried in a deep squat. You should feel weight on the balls of both feet, not on the heels.
- Glove: Out in front of the body, elbow soft and bent, fingers angled up rather than perpendicular to the ground. The mitt is a target for the pitcher and a runway for the ball, not a wall.
- Throwing hand: Behind the back, behind the right thigh, or in a soft fist next to the mitt. Never resting on the mitt, never wrapped around the wrist where a foul tip can break it.
- Eyes: Locked on the release point of the pitcher, then tracking the ball into the mitt without head movement.
The single most common stance error I see at the youth and high school level is catchers sitting too low when a runner is on first. They look comfortable and they receive the ball well, but their first action when the pitch arrives is to stand up. Standing up takes time. Catchers who already have their hips loaded skip that step entirely and go straight into footwork. If you watch elite pop times in slow motion, the catcher’s seat barely moves on the catch. The body was already in position to throw before the pitch arrived.
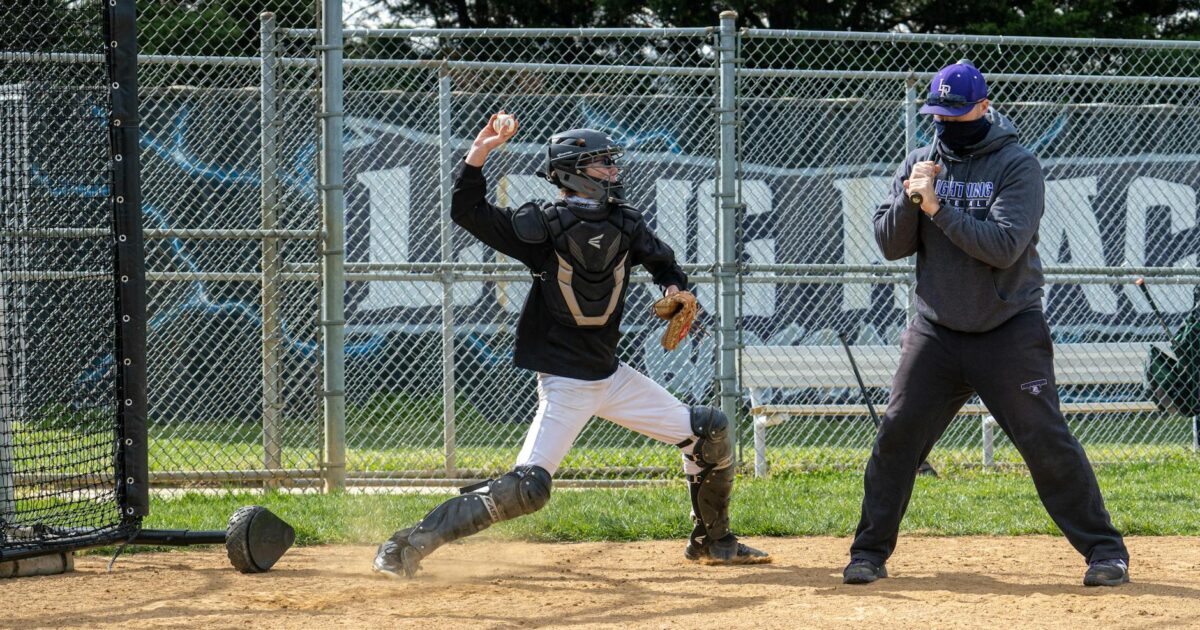
The Transfer: Where Most Pop Time Is Lost
The transfer is the moment between catching the ball and getting it into the throwing hand. It is also where amateur catchers lose the most time, often a full half-second compared to a polished receiver. A clean transfer happens at the chest, in the center of the body, with the throwing hand meeting the glove rather than waiting for the glove to come to the hand.
Three principles control a fast transfer. First, the glove rotates to the throwing-hand side as the ball arrives, presenting the ball to the bare hand. Second, the throwing hand reaches into the pocket of the glove with the fingers, not the palm, and the four-seam grip happens during the reach, not after. Third, the hands break apart at the chest, with the throwing arm taking the shortest path back to a strong launch position behind the ear.
Top catchers do not always pull a clean four-seam grip. They pull whatever grip the ball gives them and let the wrist control the spin. Trying to manipulate the ball in the glove for a perfect grip costs time and produces a tailing, sinking throw that fades to the runner’s side of the bag. A two-seam or four-seam thrown firmly with a clean wrist beats a perfect four-seam thrown a tenth slower every time.
Footwork: The Three Main Patterns
There is no single correct footwork for catchers. There are three patterns that work, and each fits different body types, pitch locations, and arm slots. I teach all three, and I let the catcher’s body tell me which is going to be his or her primary move.
| Pattern | Best for | Mechanic | Pop time impact |
|---|---|---|---|
| Jab step (rocker) | Most catchers, all levels | Right foot jabs forward and replaces left foot’s prior position; left foot strides toward the target | Balanced; produces 1.85–2.05 with average arm strength |
| Pivot (no jab) | Catchers with elite arms; pitches over the plate | Right foot pivots in place, no replacement; left foot strides directly to target | Fastest by 0.05–0.10 seconds; demands accuracy and strength |
| Jump turn | Catchers with weaker lower halves; outside pitches to a righty | Both feet leave the ground, rotate together, land in a closed throwing position | Compensates for lateral pitches; can add 0.05 if not trained |
The jab step is what I teach 90 percent of my catchers. It works on every pitch location, it produces a stable launch position, and it scales from 12U through professional ball. The pivot is what elite catchers use when they have time to choose, because it eliminates one foot movement entirely. The jump turn is a tool, not a default, and you should only use it when a pitch pulls you off the centerline so far that a jab is not realistic.
The Throw: Arm Action and Release Point
Catcher throws are not pitcher throws. The arm action is shorter, the release is higher, and the legs do not generate as much energy because there is no full stride toward the target. The compensation comes from torque. A catcher’s hips and shoulders rotate explosively, the back leg drives, and the front side stays closed long enough for the arm to whip through. The release point should be over the top or three-quarter, never sidearm, because anything below three-quarter produces a flat tailing throw that pulls the middle infielder off the bag.
The target is not second base. The target is the chest of whichever middle infielder is covering, on the third-base side of the bag, at a height of about belt-buckle level. A throw that arrives belt-high lets the fielder catch and tag in one motion. A throw that arrives at the dirt or the chest forces a second movement and gives the runner the bag.
One coaching cue I steal from Driveline Baseball’s catching program is “throw through the bag, not at the bag.” Visualize the ball traveling 10 feet past second base. That intent produces a flatter trajectory and prevents the slow looping rainbow that turns a 1.95 pop into an 0.95-second throw with a runner sliding under the tag.
Drills That Actually Build Pop Time
Pop time work is unglamorous. It is small reps, daily, with a stopwatch and honest feedback. The drills below are the ones I run most often, and they target the specific phases I described earlier. None of them require expensive equipment beyond a mitt, a ball, a partner, and a wall.
- Knee transfer drill: On both knees, partner soft-tosses balls into the mitt from 10 feet. The catcher receives, transfers at the chest, and dry-fires the throw. Goal: 30 reps where the transfer is at the chest and the throwing hand finishes behind the ear. This isolates upper body mechanics.
- Footwork ladder: Without a ball, walk through 20 jab steps in front of a mirror or video camera. Check that the right foot replaces the left, the front shoulder closes, and the head stays level. Catchers who can move their feet correctly without a ball move them correctly with one.
- Wall ball pop time: Catcher in full gear, 25 feet from a wall. A coach throws a pitch into the mitt; catcher catches, executes full footwork, and throws against the wall at a target marked with tape. Stopwatch the release. Target: 0.85 seconds from catch to release.
- Live pop time with stopwatch: Full bullpen with a runner taking a lead at first. Coach pitches, catcher throws to second, partner catches at the bag. Two stopwatches, average the times. Run 10 throws per session, log them in a notebook, watch the trendline over weeks.
- Glove side blocking transfer: A coach throws balls in the dirt to the catcher’s right and left. After the block, catcher recovers to feet and dry-fires a throw. This trains the rare but critical play where you have to throw after a blocked pitch.
- Tennis ball quick hands: A partner stands 8 feet away and rapid-fires tennis balls into the mitt. The catcher transfers and dry-throws each one. Goal: 20 reps in under 30 seconds without dropping a transfer.
I program these in cycles. Two drills per session, three sessions per week, with a live pop time stopwatch session every Saturday. Tracking is the thing most catchers skip and the thing that produces the biggest gains. If you do not write down your numbers, you cannot tell whether you are improving or chasing your tail.
Common Errors That Slow Pop Time
Below are the eight mistakes I correct most often. If your pop time is stuck at a number you do not like, run through this list before you assume you need a stronger arm.
- Standing up before catching: The body rises before the ball arrives, which usually drops the mitt and produces a passed ball. Stay loaded until the catch, then explode.
- Stepping back with the right foot: Some catchers reset their right foot behind their left before throwing, adding a wasted step. The right foot should move forward or pivot, never backward.
- Long arm action: Pitcher-style arm wraps add 0.05 to 0.10 seconds. The throwing hand should travel directly from chest to behind the ear with the elbow leading.
- Throwing across the body: Front shoulder flying open before release pulls the ball to the third-base side and forces a recovery throw. Stay closed until the hand is up and ready.
- Aiming the throw: A catcher who tries to hit a perfect spot slows down the arm. Throw firm, throw flat, throw through the bag. Accuracy comes from repetition, not from aiming.
- Lazy ready position: Sitting too low or too high with runners on, then having to adjust before throwing. The ready position is the throwing position, just paused.
- Catching with one hand on critical pitches: One-handed receiving is fine for framing with no runners on, but it adds transfer time when a runner is moving. Two hands, hands together, on every steal pitch.
- No four-seam intent: Pulling whatever grip is fine, but never thinking about grip at all produces a knuckling throw. Build the wrist habit so the ball comes out spinning whether you have a four-seam or a two.
Pitch Location and Pop Time
Not every pitch produces the same pop time. A fastball over the middle of the plate is the easiest throw because the catcher does not have to recover from a lateral position. An outside pitch to a right-handed batter is the hardest, because the catcher has to either reach across the body or use a jump turn to clear the strike zone. The numbers reflect this. My data on high school catchers shows pop times averaging 0.08 seconds slower on outside fastballs than on middle fastballs, and 0.15 seconds slower on breaking balls in the dirt.
Pitch selection matters when a steal is on. A high fastball is the catcher’s best friend in a steal situation because it arrives at the same height as the throwing motion, eliminating the need to rise. Pitch out plays still exist at the high school and college level, although they are rare in pro ball. Many staffs in 2026 prefer a high inside fastball as a “controlled pitchout” because it is harder to hit, easier to throw on, and does not give the runner any advantage on a hit and run. Working with your pitcher to choose the right pitch in steal counts is part of being a complete catcher. For more on building that battery relationship, see our guide on how to call a game as a catcher.
Strength and Mobility Work for Catchers
You cannot drill your way to a fast pop time without a body that can produce the rotational force the throw requires. Catcher-specific strength work is different from a generic baseball program. Hips, ankles, hamstrings, and the rotational core do disproportionate work behind the plate, and arm health becomes the limiting factor before mid-season. Below is the weekly framework I use with my catchers in the offseason and during the year.
| Day | Focus | Sample movements |
|---|---|---|
| Monday | Lower body strength | Trap-bar deadlift, Bulgarian split squat, single-leg RDL, ankle mobility work |
| Tuesday | Throwing and arm care | Long toss, plyo ball routine, J-bands, posterior cuff work |
| Wednesday | Rotational power | Medicine ball scoop toss, rotational shotput, anti-rotation press, pallof press |
| Thursday | Catcher-specific footwork | Pop time drills, jab step ladders, blocking and recovery, knee transfer reps |
| Friday | Upper body strength | Push-pull circuits, dumbbell row, landmine press, scapular work |
| Saturday | Live throwing or recovery | Bullpens, live pop time stopwatch, soft tissue work, sleep prioritization |
If you are juggling catching with another position, or if you are early in your development, the most underrated input is sleep. A 16-year-old catcher who sleeps eight hours per night will produce more pop time gains in three months than the same catcher sleeping five and training twice as hard. Recovery is when the nervous system encodes the new patterns you build during practice. Skip recovery and the patterns do not stick.
Equipment That Actually Helps
Equipment cannot manufacture a pop time, but the wrong equipment can quietly cost you tenths. The mitt is the biggest variable. A glove that is too stiff requires a two-handed receive every time, slowing the transfer. A glove that is too loose drops the ball on hard fastballs. A 33 to 33.5-inch mitt with a moderate break is the sweet spot for most amateur catchers. I cover the field in our review of the best baseball catcher’s mitts.
- Catcher’s mitt: 33 to 33.5 inches, broken in around the pocket but firm at the heel. A mitt that has been steamed and pre-broken in by the manufacturer is fine; one that is treated like a piece of luggage and bent in half is not.
- Throwing hand protection: A thumb guard or padded inner glove. Foul tips on the bare hand cost more pop times than any other injury, and a $15 piece of foam prevents most of them.
- Knee savers: Useful for game endurance, especially in heat, although elite catchers often skip them in steal situations because they can subtly raise the seat. If you wear them, work on jumping out of them.
- Helmet and mask: A modern hockey-style mask weighs roughly the same as a traditional mask but distributes weight better. The helmet should not slide on the head when you turn to throw to first or third.
- Catcher’s bag and shin guards: Not pop time inputs, but a tired catcher in heavy gear is a slow catcher. Modern shin guards weigh 30 percent less than gear from 15 years ago and that matters by the seventh inning.
Working With Your Pitcher
You cannot throw out the runner alone. The pitcher’s time to the plate is half the equation, and any catcher who has caught a slow-delivering pitcher knows the feeling of perfect mechanics producing a 1.85 pop on a runner who is already on the bag. The MLB benchmark for a fast delivery from the stretch is 1.30 seconds or less. Anything over 1.45 puts the catcher in an impossible position against an above-average runner.
Talk to your pitchers. Stopwatch their delivery in bullpens, not just in games. Encourage the slide step on stolen base counts. Use your signs to communicate when you want a quick delivery, when you want a pitchout, and when you want a throw to first to disrupt the runner’s timing. The catcher-pitcher partnership on the running game is one of the most underrated skills in the sport, and it usually shows up first as fewer stolen base attempts, then as more outs when teams do try. For more on pitcher mechanics in this area, see our guide on throwing a pickoff move to first base.
How to Stopwatch Pop Time Correctly
The numbers in this article only mean something if they are measured correctly, and most amateur stopwatch work is sloppy. Real pop time is captured with two reference points: the sound of the ball hitting the mitt as the start, and the sound or sight of the ball hitting the receiving fielder’s glove at second as the stop. A single stopwatch can do this if you are paying attention. A radar gun with split-second video, like a Pocket Radar Smart Coach with the app paired, makes it almost foolproof.
- Stand directly behind the catcher when timing, not in front of the plate where ball flight time will distort what you see.
- Trigger on the audible “pop” of the ball into the mitt, not on the catcher’s first movement.
- Stop on the audible “pop” at second, not on the tag.
- Time at least five throws and average them. A single throw is data; an average is information.
- Note the pitch type and location. A pop time on an outside fastball is not directly comparable to one on a middle fastball.
What Coaches and Scouts Say
“I will take a 1.95 pop with strikes over a 1.85 pop in the dirt every day of the week. Accuracy is a multiplier on velocity. A throw the shortstop has to dig out is a runner safe regardless of how fast it left your hand.” — D1 catching coach, Southeastern Conference, 2024 interview.
“The biggest jump I see when a catcher goes from high school to college is not arm strength. It is the transfer. They have been getting away with a slow transfer their whole life because the runners were also getting slower jumps. At the next level, every runner reads the pitcher and every catcher needs a transfer at the chest. That is the work.” — Independent baseball pro scout, 2025.
“Pop time is the catcher’s batting average. It is the number recruiters write down. But it is not the only number. I want to know how a catcher receives, how they block, how they call a game. Pop time gets you in the room. The other skills decide whether you stay there.” — High school head coach with multiple D1 catcher placements, 2024.
A Sample Six-Week Pop Time Program
This is the program I have used to take catchers from a 2.15 pop to a 1.95 pop in six weeks, repeatedly. It is not magic. It is volume, feedback, and attention to mechanics. The key inputs are three pop time sessions per week, one strength session per week dedicated to rotational power, and weekly stopwatch testing.
| Week | Focus | Volume | Test day target |
|---|---|---|---|
| 1 | Stance and transfer at chest, no full throws | 3 sessions of 50 dry transfers | Baseline only, no improvement expected |
| 2 | Add jab step footwork, full motion at 50% effort | 3 sessions, 30 throws each at half speed | 0.05 sec improvement |
| 3 | Build to 75% throws, introduce live pitcher | 3 sessions, 25 throws to second | 0.05 sec improvement |
| 4 | Full throws, refine grip and release | 3 sessions, 20 throws at full speed | 0.05 sec improvement |
| 5 | Pitch location variation, runner present | 3 sessions, 15 throws with simulated steal | Hold improvement under pressure |
| 6 | Game pace, full intent, every pitch | 2 sessions, scrimmage | Goal: 0.20 sec total improvement from baseline |
If a catcher hits the targets in weeks 1 through 4 but stalls in weeks 5 and 6, the issue is almost always pressure-related. Live pitching with a runner adds variables a catcher does not see in drill work. The fix is more reps in that environment, not more drill work. You cannot simulate a runner with a stopwatch.
Special Situations: Throws to First and Third
Most pop time conversation focuses on throws to second base because steals of second are the most common. But catchers also throw to first on backpicks against runners taking aggressive secondary leads, and to third when a left-handed batter is up and the catcher has a clear lane. Both throws have their own mechanics.
- Throw to first: Roughly 90 feet but with the difficulty of clearing a right-handed batter. Catchers usually take a half-step to the third-base side to open the throwing lane, then deliver. A 1.55 pop to first is excellent at the high school level, 1.45 in college and pro.
- Throw to third: Only 90 feet, but the lane is partially obstructed by a left-handed batter. Catchers either step in front of the batter (legal as long as they do not interfere with the swing) or step behind. A 1.50 pop to third is a college-level number.
- Pickoff to second: Less common because the throw is short and the runner is usually closer to the bag, but valuable on bunt situations and overshifts. A quick throw to second on a back pick can change a game.
FAQ
What is a good pop time for a high school catcher?
For varsity, anything below 2.00 is solid and anything below 1.95 will get you noticed by college coaches. The Major League average is 1.96, so a varsity high school catcher who consistently hits 1.95 is throwing at MLB-average speed, which is a real recruiting calling card.
Can I improve my pop time without a stronger arm?
Yes, and most amateur catchers can shave 0.10 to 0.20 seconds with mechanics alone. The transfer is where the time hides. Catchers with average arms but elite transfers regularly post pop times that beat catchers with cannons and slow hands.
How long does it take to drop my pop time by 0.10?
Three to six weeks of focused work, with three sessions per week and weekly testing, is realistic. The first 0.05 comes fast because most amateurs have correctable mechanical errors. The next 0.05 comes from refinement and is harder.
Should I use a knee-down stance with a runner on?
No. The one-knee-down stance has become popular for receiving and framing, but with a steal possibility you need both feet under you. Most MLB catchers who use one-knee-down stances explicitly switch back to a traditional stance when a runner is on first.
What is the difference between pop time and exchange time?
Pop time is the full cycle from catch to catch at second. Exchange time, sometimes called transfer time, is just the catch-to-release portion. Exchange time is the part of pop time that the catcher most directly controls, since it is independent of arm strength and ball flight.
Does a smaller mitt produce a faster pop time?
Slightly, because a smaller pocket means a shorter reach for the ball during transfer. But the trade-off in receiving area is rarely worth it for amateur catchers. A standard 33 to 33.5-inch mitt is correct for almost everyone.
How does a stolen base attempt actually break down by time?
An average MLB stolen base attempt looks like this: pitcher delivery 1.30 seconds, catcher pop 1.96 seconds, total 3.26 seconds. The runner needs to cover 90 feet, less the 12-foot lead, in under 3.26 to be safe. League average runner times are about 3.40, so the average runner is out by 0.14 seconds. Elite runners run 3.10 to 3.20 and need a slow battery to be safe. The math is brutal and small.
Should young catchers focus on pop time?
Below 12U, no. Focus on receiving, blocking, and developing arm strength through long toss and proper throwing mechanics. Pop time becomes a useful focus around 13U when arm strength catches up to body size. Drilling pop time too early can encourage shortcuts in mechanics that hurt long-term development.
How do I know if my pop time is being measured accurately?
The most reliable way is video at 240 frames per second, which most modern phones can do. Capture the catch and the receive at second, and use a frame counter to determine elapsed time. Stopwatch numbers from a single observer can be off by 0.05 to 0.10 seconds, especially if the observer is in front of the plate rather than behind it.
Putting It All Together
Pop time is a skill, not a gift. The catchers who throw runners out are not the ones with the strongest arms. They are the ones who have built a stance that loads them to throw, a transfer that wastes no motion, footwork that fits their body, and a release that produces a flat firm throw to the chest of the cover man. They have done the boring work of dry transfers and stopwatch sessions and tracked their numbers in a notebook. They have partnered with their pitchers to control the running game together. And they have built the body, through rotational strength work and arm care, that lets them produce that throw inning after inning, game after game.
If you take one thing from this article, take this. The transfer is where the time is hiding. Train it, film it, time it, and most of the gain you are looking for will appear within a few weeks. Then you can argue with the runner about who is faster, instead of conceding the bag before the pitch is thrown. For more on the position as a whole, see our complete guide on how to play catcher in baseball, and for the structured drill work that produces lasting gains, our catching drills guide is the next stop. The work is not glamorous. The runners do not care. But the runners do care about the stopwatch, and so should you.