How to Field Ground Balls: Technique, Drills, and Position-Specific Tips
Last updated: March 01, 2026
I have taken thousands of ground balls in my career — from fungoes in youth ball to hard one-hoppers at the college level. And the one thing I can tell you with complete confidence is that fielding ground balls cleanly is the single most repeatable, improvable skill in baseball defense. It does not require a cannon arm or elite speed. It requires proper technique, smart positioning, and reps. A lot of reps.
According to MLB Statcast data, roughly 43 percent of all balls in play are ground balls. At the youth and high school level, that number climbs even higher because hitters generate less loft. That means nearly half of all defensive plays start with the same fundamental: fielding a grounder. If you can field ground balls consistently, you will play. Period.
This guide covers everything — from the ready position and approach angle to position-specific adjustments, drills you can do alone, common mistakes that kill your fielding percentage, and advanced tips I wish someone had taught me years earlier. Whether you are a beginner learning the basics or a varsity player trying to tighten up your footwork, every section here is built on real technique, not theory.
Equipment You Need to Field Ground Balls
Before we get into mechanics, let us talk gear. You do not need much, but the right equipment makes a real difference in how quickly you develop soft hands and clean transfers.
| Equipment | Why You Need It | Recommended Pick |
|---|---|---|
| Infield glove (11″–11.75″) | Smaller pocket forces clean receiving and faster transfers | Wilson A2000 1786 or Rawlings Heart of the Hide |
| Fielding trainer (flat glove or paddle) | Eliminates the pocket so you must use two hands and proper technique | SKLZ Softhands or Rawlings 5-Tool trainer |
| Bucket of baseballs (2–3 dozen) | Allows high-rep solo work off a wall or rebounder | Diamond D-OB practice balls |
| Rebounder net or concrete wall | Creates random hops for reaction training when you practice alone | Rukket rebounder net |
| Infield cleats (low cut) | Low-cut design allows lateral movement and quick first steps | See our infielder cleats guide |
| Cones or mini hurdles | Mark footwork stations for approach-angle drills | Any 6-inch training cones |
One thing I will say: do not use an oversized glove for infield work. A 12.5-inch outfielder’s glove will hide bad habits. You want an 11- to 11.75-inch glove that forces you to receive the ball out in front and funnel it into your throwing hand. If you are working on fielding specifically, a flat training glove is even better for the first part of your session because it teaches your hands to stay soft and work together.
The Ready Position: Where Every Ground Ball Starts
The ready position is the single most important thing you can control before the ball is hit. Get this wrong and you are already behind. Here is how I teach it:
Step 1: Feet slightly wider than shoulder width. Your weight should be on the balls of your feet, not your heels. Think athletic stance — knees bent, hips low, chest slightly forward. You want to feel like a coiled spring, ready to explode in any direction.
Step 2: Hands out in front, relaxed. Your glove should be open and below your knees, not pinned to your side. Keeping your hands out front gives you a visual reference point and shortens your reaction path to the ball.
Step 3: Creep step as the pitcher delivers. This is the timing mechanism most young players skip. As the pitcher begins their delivery, take a small shuffle or hop forward so you are moving toward the plate at the moment of contact. You never want to be caught flat-footed. A good creep step takes about 0.3 seconds and puts your weight forward so you can react laterally in either direction.
Step 4: Read the swing, not just the ball. Advanced fielders watch the bat angle to get an early read on direction and speed. A pulled swing to the left side means the ball will arrive faster and more to your glove side if you are a shortstop. A late swing means the ball will be slower and more toward your backhand. Training your eyes to pick up these cues shaves critical milliseconds off your reaction time.
How to Approach a Ground Ball: The Correct Angle and Path
One of the biggest misconceptions in fielding is that you should charge straight at the ball. In many situations, that is exactly wrong. Here is the approach framework I use:
Work through the ball at a slight angle. On a routine ground ball, you want to approach on a path that is slightly to your glove side. For a right-handed thrower, this means angling slightly to the left. Why? Because this angle sets up your footwork so that your momentum carries you naturally toward first base after you field the ball. If you charge straight at the ball, you have to redirect your body after the catch, which costs time and creates throwing errors.
Time the hop. Ground balls bounce. Your job is to field the ball at one of three points: the short hop (just after the bounce), the long hop (at the top of the bounce), or the in-between hop — which is what you want to avoid at all costs. The in-between hop catches you mid-transition and is the primary cause of bobbles and errors at every level. Good fielders speed up or slow down their approach to catch the ball on a favorable hop. This is a skill that improves dramatically with reps.
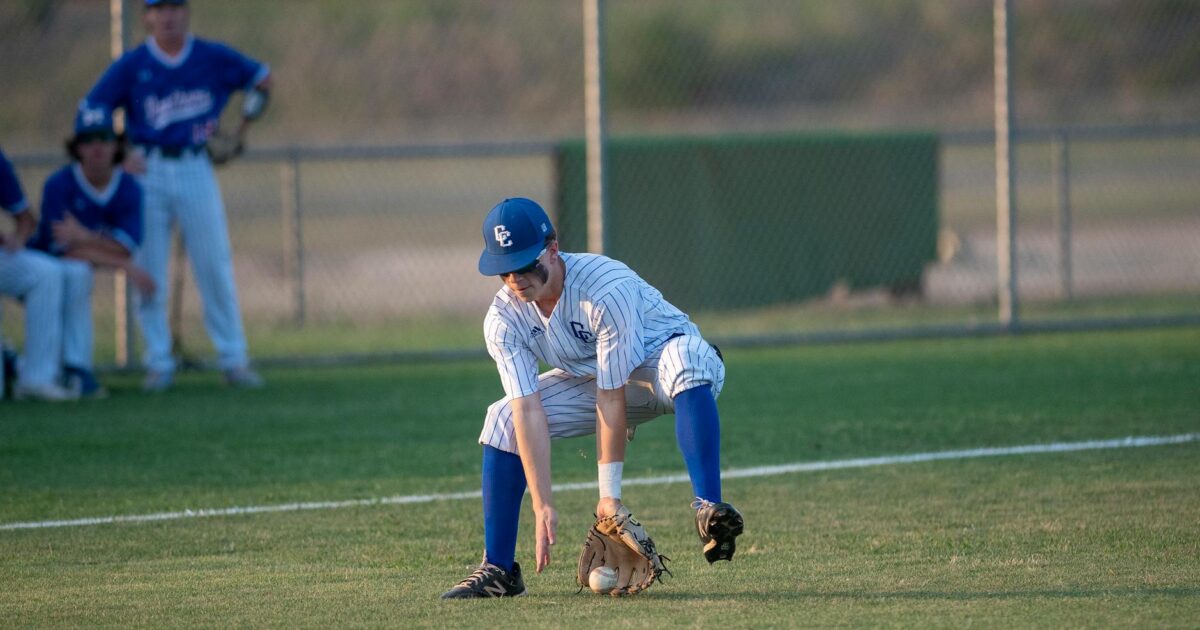
Stay low through the ball. Your glove should travel from low to high, never the other way around. Think about scooping the ball up, not stabbing down at it. Keep your rear end down and your eyes tracking the ball all the way into the glove. The moment you stand up early, you lose sight of the ball and create a gap between your glove and the ground where the ball can sneak through.
Step-by-Step: Fielding a Routine Ground Ball
Let me walk you through every phase of fielding a standard ground ball hit directly at you. This is the foundation for everything else.
Step 1: Get into your ready position with your creep step timed to the pitch.
Step 2: Read the ball off the bat. Identify the speed, direction, and whether the ball is on the ground or a short hop situation.
Step 3: Take your first step. On a ball hit right at you, your first move is forward and slightly to your glove side. Drive off the ball of your back foot. Do not cross your feet — use a lateral push step.
Step 4: Set up wide. As you approach the ball, get your feet wider than your shoulders. Your left foot (for right-handed throwers) should be slightly ahead of your right foot, creating a staggered stance.
Step 5: Field the ball out front. Your glove should receive the ball in front of your left foot, not between your legs or under your body. Fielding out front gives you the best sightline and allows you to funnel the ball toward your center of mass. Your bare hand should be directly above the glove, ready to secure the ball the instant it enters the pocket.
Step 6: Funnel and transfer. As the ball enters the glove, bring both hands toward your belt buckle and up toward your throwing shoulder. This funneling motion creates a smooth, rhythmic transfer. The ball should move from glove to throwing hand to throwing position in one continuous motion. No pause, no extra movement.
Step 7: Separate and throw. As your hands funnel up, your feet should be working simultaneously. Step toward your target with your left foot (right-handed thrower), separate your hands, and make a strong, accurate throw. Your momentum from the approach should carry you toward first base.
The entire sequence — from creep step to throw — takes roughly 2.5 to 3.5 seconds at the high school level and under 2 seconds for elite MLB infielders. The goal is not to rush but to eliminate wasted movement so every motion flows into the next.
Fielding Backhand Ground Balls
The backhand play is one of the most visually impressive plays in baseball, and it is also one of the most mechanically demanding. Here is how to execute it properly.
Crossover step first. When the ball is hit to your backhand (glove) side beyond your normal range, your first move is a crossover step with your right foot (for right-handed throwers). Drive hard off your left foot, cross over, and open your hips toward the ball. This crossover gives you maximum range while keeping your body in a position to throw.
Extend the glove with the backhand turned. Reach with your glove hand and rotate the glove so the fingers point toward the ground or slightly backward. You are catching the ball on the back side of the glove. Keep your bare hand close but not in the way — on a full-extension backhand, you will field the ball with just the glove and secure it during the transfer.
Plant and throw. After catching the ball, plant your right foot hard, square your shoulders toward the target, and make a strong throw. On a deep backhand, you may need to throw from a slightly lower arm slot to generate enough velocity. This is normal and acceptable — accuracy matters more than a textbook arm angle on this play.
One advanced tip: on a slow backhand roller where you are ranging far to your left, consider using a jump throw. Plant off your right foot, jump slightly into the air as you rotate your body, and throw across your body while airborne. This saves a full step compared to planting and squaring up. MLB shortstops like Elly De La Cruz make this play look effortless, but it takes serious practice to do consistently.
Fielding Slow Rollers and Charging the Ball
Slow rollers — often called “do or die” plays — require a completely different approach than routine ground balls. You are essentially sprinting forward, picking up a moving ball, and throwing on the run. Here is the technique:
Charge aggressively. The moment you recognize a slow roller, sprint toward the ball at full speed. Hesitation kills this play. Every tenth of a second you waste is a tenth of a second the runner uses to get closer to first base.
Bare-hand when possible. On a true slow roller, fielding with the bare hand is often faster and more efficient than gloving the ball. Approach the ball slightly to your right side (for right-handed throwers), scoop it with your bare hand using a clean sweeping motion, and immediately transition into your throw.
Use the glove-and-shovel on faster rollers. If the ball has more speed, field it with your glove at the glove-side foot, quickly transfer, and use a shovel toss or sidearm throw to first base. The shovel toss — an underhand flip — is appropriate when you are close to first base (within about 40 feet).
Footwork is everything. On the bare-hand play, your left foot should hit the ground as you pick up the ball, so that you are already in position to throw off your left foot. This means you need to time your approach so that your steps align with the pickup point. It is like fielding a bunt — which we cover in depth in our bunting guide — but with slightly more distance to cover.
Position-Specific Ground Ball Adjustments
While the fundamentals of fielding ground balls are universal, each position has unique demands. Here is what changes depending on where you play:
Shortstop
Shortstops field more ground balls than any other position — roughly 25 percent of all infield grounders. You need elite lateral range, a strong arm for throws from deep in the hole, and the ability to make the relay throw on double plays. Shortstops should practice their backhand play, jump throw, and the feed to second base on the double play more than anything else. A quick exchange — glove to hand in under 0.5 seconds — is non-negotiable.
Second Baseman
Second basemen have a shorter throw to first base, so the priority shifts from arm strength to quick feet and fast hands. The double play pivot — receiving the ball from the shortstop while avoiding the sliding runner — is the signature play at this position. Second basemen also field more balls up the middle, so ranging to the glove side (toward center field) and making the throw back across the body is a critical skill.
Third Baseman
Third base is called the “hot corner” for a reason. Balls arrive faster here because the distance from home plate is shorter and most hard ground balls to third are pulled by right-handed hitters. Third basemen need excellent reaction time, a strong arm for the long throw across the diamond (approximately 127 feet), and the ability to field slow rollers on the charge. At the MLB level, third basemen have about 1.3 seconds from the moment the ball is hit to complete the throw to first base on a routine play.
First Baseman
First basemen field fewer ground balls in the traditional sense but need to be exceptional at scooping low throws from other infielders. When you do field a ground ball at first, your primary options are to field and step on the bag yourself, or field and flip to the pitcher covering. First basemen typically use a slightly larger glove (12″–12.25″) for the added reach on scoops and picks.
Pitcher
Pitchers are the forgotten fielders. After delivering the pitch, you need to be in a balanced fielding position, ready for a ball hit right back at you. Comebackers can reach the mound at speeds exceeding 100 mph, giving you less than 0.4 seconds to react. Pitchers should practice fielding bunts, covering first base on ground balls to the right side, and catching line drives in self-defense. We talk about throwing mechanics in our drills guide, and those same arm care principles apply when making throws from the mound to bases.
Common Mistakes When Fielding Ground Balls
I have coached hundreds of players and I see the same mistakes over and over. Here are the most common ones and how to fix them:
| Mistake | Why It Happens | How to Fix It |
|---|---|---|
| Standing too upright in ready position | Fatigue, laziness, or not understanding the importance of staying low | Bend at the knees AND hips; get your rear end down and chest over your toes |
| Fielding the ball between the legs | Not getting the feet set wide enough or approaching too straight-on | Field the ball in front of your glove-side foot, outside your body line |
| Pulling the head and eyes up early | Looking at the runner or the throw target before securing the ball | Watch the ball all the way into the glove; trust your peripheral vision for the throw |
| Stabbing down at the ball | Starting with the glove too high and bringing it down | Start with the glove low and work up; ground-to-sky path every time |
| Flat feet during the creep step | Not timing the pre-pitch movement correctly | Practice the creep step during batting practice until it becomes automatic |
| One-handing routine ground balls | Trying to look flashy or being lazy with the bare hand | Two hands on every routine play; secure the ball before thinking about the throw |
| Catching the in-between hop | Not adjusting approach speed to time a favorable bounce | Speed up to take the short hop or slow down to take the long hop — never get stuck in between |
| Slow transfer from glove to hand | Poor glove positioning or habit of cradling the ball | Practice the funnel: glove to belt buckle to throwing shoulder in one motion |
| Overthrowing on routine plays | Adrenaline and trying to rush the throw | An accurate throw beats a hard throw every time; trust your arm and focus on the target |
| Not charging slow rollers | Waiting for the ball to come to you instead of attacking | Read ball speed off the bat; if it is dying, sprint forward immediately |
Ground Ball Drills You Can Do Alone
You do not need a coach or a full infield to get better at fielding ground balls. Here are my favorite solo drills that build real game skills:
1. Wall Ball (10–15 minutes)
Stand about 15 feet from a concrete wall or rebounder net. Throw the ball against the wall at varying speeds and angles. Field the return hop using proper technique — low glove, two hands, funnel to belt. This drill is the single best way to get high-volume reps in a short amount of time. Aim for 100 to 150 ground balls per session. Vary the angle and speed of your throws to create different hop patterns.
2. Short Hop Drill (5 minutes)
Throw the ball into the ground about three feet in front of you so it bounces up as a short hop. Field it cleanly with soft hands. This teaches you to pick the short hop, which is the most important hop to master because it is the safest one to field — the ball has the least lateral movement right after the bounce. Do 50 reps, alternating forehand and backhand.
3. Bare-Hand Pickup Drill (5 minutes)
Set five or six baseballs in a line about three feet apart. Sprint to each ball, pick it up bare-handed with proper footwork (left foot down at pickup for right-handed throwers), and throw to a target. Reset and repeat. This drill builds the coordination and timing needed for slow roller plays.
4. Lateral Shuffle Drill (5 minutes)
Set two cones about 10 feet apart. Start at one cone in your ready position, shuffle laterally to the other cone, drop into your fielding stance, and simulate fielding the ball with proper glove position. Shuffle back and repeat. Do three sets of 10. This builds the lateral quickness and low body position you need for range plays.
5. Tennis Ball Reaction Drill (5 minutes)
Have a partner stand 20 feet away and throw tennis balls at random angles — forehands, backhands, and short hops. Because tennis balls bounce unpredictably compared to baseballs, this drill sharpens your reaction time and hand-eye coordination. If you are training solo, throw the tennis ball against a wall from a short distance for a similar effect.
6. Paddle Glove Funnel Drill (10 minutes)
Use a flat fielding trainer or paddle glove (no pocket) to field ground balls. Because there is no pocket to trap the ball, you are forced to use two hands and funnel properly. Start with slow rollers and work up to harder ground balls. This is one of the most effective drills for developing soft hands. Do 50 to 75 reps.
Partner and Team Ground Ball Drills
When you have a partner, coach, or full team available, these drills take your fielding to the next level:
Rapid Fire Fungo. A coach hits ground balls from 60 feet at a rapid pace — one every 3 to 4 seconds. The fielder must field, throw to the target, and immediately reset for the next ball. This builds stamina, quickens the transfer, and trains you to reset your body position under fatigue. Start with 10-ball sets and build up to 20.
Double Play Turns. Two infielders work the double play feed and pivot with a coach hitting ground balls. The focus is on the timing of the feed (underhand or backhand flip), footwork around the bag, and the relay throw to first. Double plays are the most complex ground ball play in baseball, and they require both players to be in sync. Practice both the shortstop-to-second and second-to-shortstop feeds.
Slow Roller Competition. Coach rolls balls at varying speeds. The fielder must decide whether to bare-hand or glove the ball based on the speed and distance. Make it competitive by tracking successful plays out of 10. This drill builds decision-making under pressure, which is the hardest skill to teach off the field.
Range Drill with Cones. Set cones at the normal fielding position, one extra step to the left, and one extra step to the right. A coach hits ground balls to each zone in random order. The fielder must adjust their approach angle and footwork for each ball. This drill teaches you to read the ball and choose the correct approach path instead of defaulting to one movement pattern.
Advanced Tips for Fielding Ground Balls
Once you have the fundamentals locked in, these advanced techniques will separate you from average fielders:
Play the infield grass, not the dirt. On turf fields or well-maintained grass, the ball moves faster and truer. On rough dirt, the ball can kick unpredictably. Knowing your field surface and adjusting your positioning (deeper on turf, slightly shallower on bumpy dirt) is a subtle but important edge.
Adjust your depth based on the hitter. Against a fast runner, you may need to play shallower to give yourself more time on the throw. Against a slow runner who hits the ball hard, play deeper for extra reaction time. Elite infielders adjust their positioning by 3 to 5 feet on every batter based on scouting data. Even at the amateur level, paying attention to opposing hitters during the game gives you an advantage.
Use pre-pitch reads. Before the pitch, look at the catcher’s setup (inside or outside), the pitch type if you know the signs, and the hitter’s stance. An inside fastball to a right-handed pull hitter means the ball is likely coming to the left side of the infield. This kind of anticipation lets you cheat a step in the right direction before the ball is even hit.
Master the backhand-to-jump-throw combo. This is the elite-level play for shortstops and third basemen. Field the ball on your backhand, plant your back foot, jump, rotate in the air, and throw while airborne. The key is to generate throwing power from your core rotation, not just your arm. Practice this with a partner at increasing distances until you can make the throw from deep in the hole accurately.
Work on your internal clock. Great fielders know instinctively how much time they have on each play. A slow runner gives you roughly 4.3 to 4.5 seconds from contact to first base. A fast runner gives you 3.9 to 4.1 seconds. Develop your sense of timing so you know when you can take an extra beat to secure the ball versus when you need to rush the throw. This prevents both unnecessary errors from rushing and missed outs from being too casual.
Practice fielding on bad hops intentionally. During warm-ups, have your partner throw short hops and in-between hops on purpose. Most players only practice on clean hops and then panic when the ball kicks funny in a game. By training on bad bounces, you build the hand speed and body control to adjust when the unexpected happens. According to defensive metrics, elite infielders convert roughly 75 percent of “tough chance” ground balls — compared to about 50 percent for average fielders — largely because of this training.
Building a Weekly Ground Ball Training Program
Consistent practice beats occasional marathon sessions. Here is a weekly training plan I recommend for players who want to significantly improve their ground ball fielding over the course of a season:
Monday — Solo Wall Ball and Short Hops. 15 minutes of wall ball (100+ reps) followed by 50 short hop reps. Focus on clean technique with no rushing.
Tuesday — Lateral Movement and Range. Lateral shuffle drill (3 sets of 10), then cone range drill if you have a partner. If solo, use a rebounder from different angles.
Wednesday — Bare-Hand and Slow Roller Work. Bare-hand pickup drill (3 sets of 6 balls), then charge-and-throw reps. This is your speed day — everything should be at game pace.
Thursday — Transfer Speed and Throwing Accuracy. Paddle glove funnel drill (50 reps) combined with targeted throws to a net or partner. Focus on the glove-to-hand exchange speed. Time yourself if possible — aim for a transfer under 0.6 seconds.
Friday — Game Simulation. If you have a team practice, take extra ground balls during infield. If solo, do a mixed session: 10 routine, 10 backhand, 10 slow rollers, 10 short hops. Treat each one like a game rep with full intensity.
Weekend — Rest or Light Work. If you have games, let the games be your practice. If not, do a light 10-minute wall ball session to stay sharp.
Over the course of 8 to 12 weeks, this program delivers around 2,000 to 3,000 quality ground ball reps. That volume of focused practice creates noticeable improvement in any player’s fielding consistency. For overall development alongside your fielding work, check out our complete player development guide.
How to Field Ground Balls on Different Surfaces
The surface you play on changes how the ball behaves, and you need to adjust accordingly.
Natural grass: The ball slows down as it passes through the grass, especially on thick or wet outfield grass. Ground balls on grass tend to stay lower and lose speed more quickly. Play slightly more aggressive (shallower) to compensate for the slower ball speed.
Artificial turf: The ball skips faster and bounces higher on turf. The hops are generally truer (less random) but the increased speed reduces your reaction time. Play deeper on turf and be prepared for bigger, faster hops. Many professional infielders say turf adds about 5 to 10 mph to ground ball speed compared to natural grass.
Dirt infield (youth and high school): Dirt infields vary wildly. A well-maintained, packed dirt infield plays almost like turf. A bumpy, rocky youth field can make even routine ground balls unpredictable. On rough dirt, stay lower, keep your glove wider, and expect bad hops. The single best thing you can do on a bad infield is shorten your distance to the ball by playing shallower — this gives the ball fewer bounces to go wrong.
Wet conditions: Rain-soaked fields make the ball heavier and slower, but the ball can also skid unpredictably on wet grass or mud. Keep your glove even lower than normal and field everything with extra emphasis on two hands. Wet baseballs are also harder to grip when throwing, so prioritize a clean, firm grip before releasing — a slightly late but accurate throw beats a quick wild one.
Frequently Asked Questions About Fielding Ground Balls
What is the proper glove position for fielding a ground ball?
Your glove should be open, fingers pointing down, positioned out in front of your glove-side foot and close to the ground. The glove works from low to high — never the other way. Your bare hand hovers directly above the glove, ready to secure the ball the instant it enters the pocket. Think of your hands as a funnel that channels the ball from the ground into your throwing position.
How do I stop being afraid of ground balls?
Fear of ground balls is extremely common, especially in younger players. The best cure is progressive exposure. Start by fielding slow rollers from close range. Gradually increase the distance and speed as your confidence builds. Using a softer training ball (like an Incrediball or tennis ball) at first can help, too. Once you develop trust in your hands and technique, the fear fades. The key is that your glove stays out in front of your body where you can see it and the ball together — that visual connection builds confidence.
Should I use one hand or two hands to field ground balls?
Two hands on every routine ground ball. The bare hand secures the ball in the glove and starts the transfer to your throwing hand. The only time one-handing a ground ball is acceptable is on a full-extension backhand play where your bare hand physically cannot reach the ball. Even then, get the bare hand on the ball as quickly as possible after the catch.
How many ground balls should I field in practice?
Quality matters more than raw quantity, but a good target is 50 to 100 ground balls per focused practice session. In a full team practice, infielders typically take 20 to 30 ground balls during infield drills, so supplementing with solo wall ball work is essential if you want to improve faster. Over the course of a week, aim for 250 to 400 total ground ball reps across all your practice sessions.
What is the best way to improve my reaction time on ground balls?
Three things: the creep step (so you are never flat-footed), pre-pitch reads (watching the bat angle and swing direction), and training with tennis balls or short-distance rapid-fire drills. Reaction time is partly innate, but the anticipation component — reading the swing, knowing the situation, cheating your positioning — is entirely trainable and often matters more than raw reflexes.
How do I field a ground ball and throw to first base faster?
The biggest time-savers are your approach angle (slightly to the glove side so your momentum carries toward first) and your transfer speed (funnel, do not cradle). Eliminating unnecessary steps between fielding and throwing is how elite infielders shave time. Practice your footwork so that your body is already rotating toward first base as you field the ball. The throw should feel like one continuous motion, not a field-then-throw sequence.
What size glove is best for fielding ground balls as an infielder?
For middle infielders (shortstop and second base), an 11″ to 11.5″ glove provides the best combination of feel and quick transfers. Third basemen can go up to 11.75″ for extra range on hard-hit balls. First basemen use a mitt between 12″ and 12.5″. I personally recommend trying a Wilson A2000 or Rawlings Heart of the Hide — both offer excellent leather and break-in characteristics for infield work.
Final Thoughts on Fielding Ground Balls
Fielding ground balls is the bedrock of infield defense. It is not glamorous, and it does not show up on highlight reels the way a diving catch does. But consistently fielding routine ground balls — and converting the tough ones at a high rate — is what separates starters from bench players at every level of baseball.
The players who field the best are not necessarily the most athletic. They are the ones who put in the most deliberate practice. They understand hop timing. They have a reliable ready position and creep step. They field the ball out front, funnel with soft hands, and make accurate throws. All of that is trainable, and all of it improves with focused repetition.
Start with the fundamentals in this guide, build a weekly practice routine, and commit to getting better one ground ball at a time. If you are looking to pair your fielding improvement with better arm strength and accuracy, check out our baseball throwing drills guide for complementary training. And if you are working on your overall game, our guide on becoming a better baseball player ties it all together into a complete development system.
Now go take some ground balls.